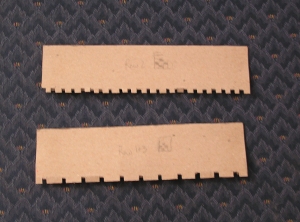
As promised, I want to share my “comb” trick for machine knitting “fair isle” on a basic knitting machine. After much tedious and slow hand manipulation, I came up with this idea to make cardboard combs to manipulate a whole row at at time. This idea is probably not original or novel, I probably saw something similar somewhere long before I had a knitting machine. But if I had seen it somewhere before, I managed to forget about it through exhaustive hours of hand manipulation of a dense pattern. Then the idea started to surface in the back of my mind, but I somehow thought it would be more work to stop, measure, and cut out a comb.
Desperation makes us keen to experiment.
So here are my little life-savers. On top is the comb for row two, and on the bottom is the comb for rows 1 & 3. It’s a five row pattern, and the last two rows were just plain in the main color. To make them, I took a couple of small pieces of stiff (but not super thick) cardboard that were the length of the work. I’m sure you could use them in small sections if you had a wider piece on your knitting machine. I placed them against the needle butts on the knitting machine bed with the needles in position for the start of the corresponding row, and I marked roughly a dash above each needle that was flush with the cardboard. Thus, the needles in holding position (contrast color) were unmarked. Then I cut into the cardboard to make gaps for each holding-position needle, and folded the cardboard back to form the gaps.
Now I’m going to share my very first knitting tutorial video on how this works in action. Keep in mind that each row takes three passes: Main color with outer cam knob up, return (nothing knit, but needles go back to working position), contrast color with both cam knobs down. Essentially, you are knitting one color, then returning the carriage to knit the other color on the same row.
I apologize for the lack of sound, I don’t have a true video camera, just an old digital still camera that has a movie mode:
This solution turned out to be a huge time-saver for me, and I was really happy to be able to get this project finished. I imagine that you wouldn’t want to make dozens of combs if you had a more complex fair isle pattern. If you’ve got an even better way of doing simple fair-isle on a basic no-frills knitting machine, let me know!
Until next time, keep those needles (and needle beds) clicking!


Pingback: Spring designs for machine knitting « Unravelling Argyle
Pingback: Forethought heels vs machine-shaped « Unravelling Argyle
I personaly think this is a cool idea. Yes it would be faster to hand knit until you get used to it. I’m going to give it a try! Thank you.
I have an old (circa 1959) KnitKing flat bed knitter. Years ago, my ex took a flat piece of plastic about 1/2″ thick, drilled holes in the bottom, made metal pins for the holes so that I could select the pattern I needed for a particular design. Works like your cardboard “pushers”. I love making socks on the machine and people love the socks. I’m just now going to try argyle socks.
Love it! Good luck with the argyle, that sounds awesome!
Very encouraging, to make our own tools! Six years later, your video is still blessing others. Thank you.