This article originally appeared as an “Editor’s Letter” and a report in the Northcoast Knitting Guild Newsletter, November-December 2019 edition. If you are in the Cleveland/Northeast Ohio area, our guild has educational and fun meetings every month, and many friendly knit-ins besides. Check out our website for more information! Northcoast Knitting Guild
I have lately been obsessed with a farm dream. I imagine the sort of place where I have room for a flock of chickens, a much larger garden, a small orchard, maybe some goats, and perhaps something of the shearable persuasion once the food-producing routine is solid. This is not the first time I have been caught up by this longing. And I’ll bet I’m not the only person in the guild to have contemplated owning enough space for a few sheep or an alpaca. A few of you probably already own some fiber-bearing creatures. What is it about us makers and artisans that get us thinking about owning the process from start to finish?
My economic and commuting reality might not allow for my full-scale dream farm any time soon, but in the spirit of long and cozy late-fall nights, when the garden work is coming to a natural close, it’s a good time for dreaming. And while we knit and dream of capering sheep, let us contemplate what it takes to produce our wools. Check out my article below on what owning some sheep might entail. Even if you are not afflicted with agricultural aspirations, it might give you a new perspective on some of the small farm booths that you see at fiber shows. What does it take to produce that skein of yarn?
First, please let me acknowledge that I am not a sheep farmer, and don’t know the day-to-day realities of sheep farming. This is meant as an overview for people who enjoy sheep products and and want to know more about wool production fundamentals. If I missed something in this rough survey, please forgive my error and feel free to send a correction, update, or additional information for the next Newsletter issue and/or blog post.
Wool Production Industry:
China, Australia, and New Zealand are the world’s largest producers of wool (1). While China produces a bunch of wool, they also import a lot of wool, accounting for just over half of the US wool exports in 2017 (2). That’s 4.39 million pounds of clean US wool (2) which is presumably destined for China’s very large textile manufacturing industry. There may be as many as 500 breeds of sheep in the world (1), but since many are best suited to a particular place or a niche market, only about 47 are recognized by the American Sheep Industry Association (3). Merino and Rambouillet are popular industry standards for producing fine (as in thin or low micron) wools. If you were going to do farming as a large scale ranch in Texas or Wyoming, which are some of the top wool producing states in the US (4), you would probably go with one of these breeds. There are probably some large Ohio sheep farms as well. Those are the big players, but if you are thinking more of a small hobby farm, or in the current lingo, a “side hustle”, to supply and subsidize your own fiber pursuits, you may want to look at some specialized breeds.
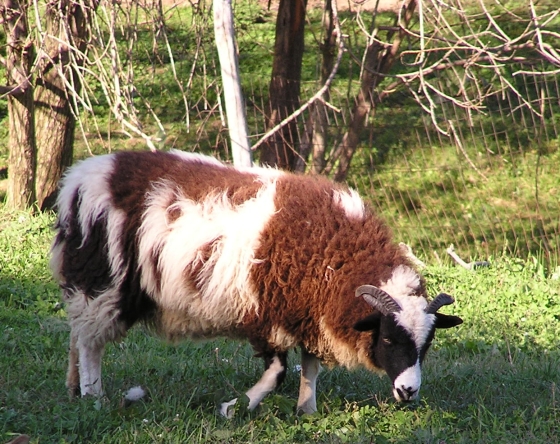
Jacob Sheep on a farm in New York State. Photo 2008 by Bess Antol.
Special Breeds:
Lincoln, Romney, Border Leicester and Lincoln Longwool are better known among hand spinners for their luxuriously longer fibers that may not be as fine in diameter, but can feel as soft if spun in a way that suits their texture. Huge industrial mills are most efficient if they only spin yarns in a few ways, but a hand-spinner has more ability to produce the best from a fiber’s unique characteristics. You probably know that some breeds of sheep are raised for meat and have a poorer quality fleece, but there are also dual purpose breeds that produce good fleeces and also have a bulky frame that provides good meat. Corriedale is a dual purpose breed you may have heard of at a fiber show (5).
In addition to the commonly known sheep, there are many other wonderful rare and heritage breeds of sheep that can give a small farmer joy and wool, however. One of my favorites is the Jacob sheep, for their delightfully quirky appearance being splotched with dark and light wool, and 2 to 6 horns that wave outward at odd angles making them look a little like they have avante garde hats. Some heritage and rare breeds were bred for thriving in niche environments including semi-tropical Florida – check out the Florida Cracker (6). While some of these breeds might not make a farmer rich in coin, preserving some of these sheep traits may help future farmers and agricultural scientists breed resilient sheep for future environmental challenges.
If you get excited about the artistic potential of creating with rare wools, check out the Livestock Conservancy’s “Shave ‘Em to Save ‘Em” program where fiber artists are encouraged to try many different types of fiber and earn prizes. No sheep ownership required!
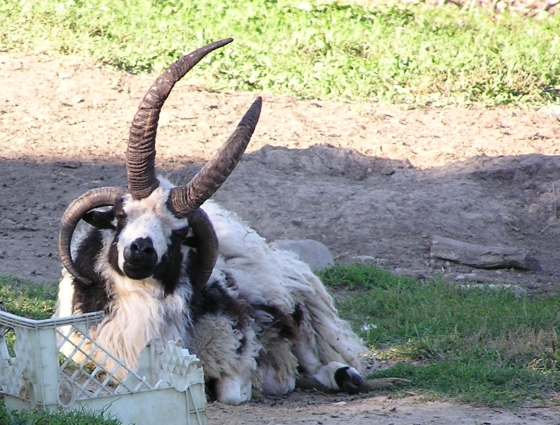
Jacob Sheep with 4 asymmetrical horns (totally normal for Jacob Sheep) on a farm in New York State. Photo 2008 by Bess Antol.
Raising Sheep:
To take the dream to a natural conclusion, you’d need some resources. First, you’d need some land. They say 2 sheep on an acre depending on how well your pasture grows (7), and you may want enough room for pasture rotation. Sheep are herd creatures, and will be less stressed when they can live in a group – some sources say at least 5 sheep will show normal flock behaviors (8). For predator protection, you probably need a either a barn, a herding dog, a donkey, or a llama. Fencing is required to keep sheep in, and some fences can also keep predators out. Sheep are pretty wooly, so you don’t necessarily need a barn if you have predator deterring guard animals. Three-sided shelters are fairly common weather protection, so that the sheep have somewhere to hide from excessive rain, wind, or sun and also to keep their hay dry (8).
For our mental sheep picture so far, we’ve covered pasture, protection, and shelter. The other big question is food. Pasture might be fairly lean in an Ohio winter because most plants and grasses stop growing. Hay can be purchased (7) to get through the lean months and to save the pasture from being eaten to death. Commercial sheep feed, a salt lick, or a mineral supplement might also be helpful in the winter (8).
If you want to own some sheep, you’ll probably need a basic veterinary kit and a little training (8). Some vaccines can be administered by the owner, and some must be given by a farm animal veterinarian. Hoof trimming and deworming are often handled by the sheep owner. There are additional considerations if you want to milk your sheep or raise lambs. Managing a ram is considered an advanced topic, but you can arrange for time with someone else’s ram if you are interested in breeding.
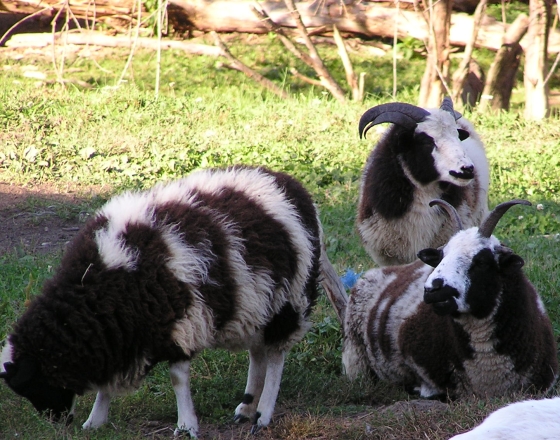
Jacob Sheep on a farm in New York State. Photo 2008 by Bess Antol.
Ok, my dream farm now has lots of frolicking sheep! When do I get the yarn?
How often you shear depends on the breed of sheep, but most need to be sheared at least once a year in the spring. There are professional shearers who can be hired, but some small farmers prefer to learn to do it themselves. A freshly shorn fleece needs to be picked over in a process called “skirting” to remove badly stained or dung-encrusted parts of the wool (9). Some handspinners will then take their fleece and “scour” or wash it themselves to prepare it for spinning. You can also ship boxes of fleeces to the nearest small spinning mill. These mills have a menu of services ranging from simply scouring and combing, to spinning, dyeing, and one will even make socks from your sheep’s wool for you – which is probably of less interest to a knitting guild, but maybe you want a product that you can resale quickly out of surplus wool.
Sources:
- International Wool Textile Organization’s Wool Production page: https://www.iwto.org/wool-production
- American Sheep Industry Association’s December 8, 2017 Newsletter: https://sheepusa.org/newsletter/newsmedia-weeklynewsletter-2017-december-december82017-americanwoolexportsincrease24percentinmarketyear2017
- South Dakota State Extension article on Sheep Breeds: https://extension.sdstate.edu/sheep-breeds
- Agricultural Marketing Resource Center: Wool Profile: https://www.agmrc.org/commodities-products/livestock/lamb/wool-profile
- Sheep 101: Breed Selection: http://www.sheep101.info/201/breedselection.htm
- Livestock Conservancy: Conservation Priority List #Sheep: https://livestockconservancy.org/index.php/heritage/internal/conservation-priority-list#Sheep
- Cornell College of Agriculture and Life Sciences: Small Farms “How to Get Started with Sheep”: https://smallfarms.cornell.edu/2010/07/how-to-get-started-with-sheep/
- Sheep 101: Sheep as Pets: http://www.sheep101.info/201/pets2.html
- Hobby Farms: “Spinning a Wool of your Own”: https://www.hobbyfarms.com/spinning-a-yarn-of-your-own-2/